DIY chocolate snowman templates. How to pack a snowman-shaped chocolate bar for the new year
If you think about it, any little thing can be an incredible gift. Much depends on how you present it and beat it. The originality and non-standard approach is extremely important. Even such a trifle as a chocolate bar can become a real masterpiece.
Therefore, we will tell you how to make a package of Snowman chocolate with your own hands - very unusual, fun and festive!
With such funny snowmen you can please your loved ones, friends of colleagues and everyone, everyone, everyone else in the upcoming new year holidays, weekends and vacations. Moreover, everyone loves chocolate, and such packaging is very simple.
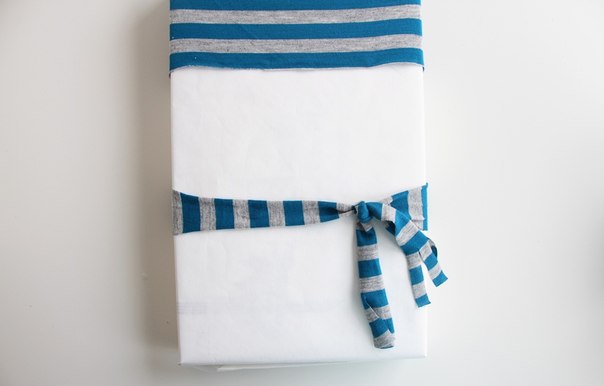
First, wrap a chocolate bar or a box of chocolates in a white sheet of paper and secure with glue or tape - this is the base, the body of the snowman.
Now let's start making clothes for packing the Snowman chocolate. We need a little of any kind of matter. You can use an old T-shirt, dress, or scarf. In our example, a vest is used.
We wrap the top of the snowman with a cloth. We fasten the edges. We wind the fabric on top - we get a cute hat. Now we cut the fringe on top with scissors, as shown in the figure.


We make a belt from a thin strip and tie a chocolate bar in the middle.
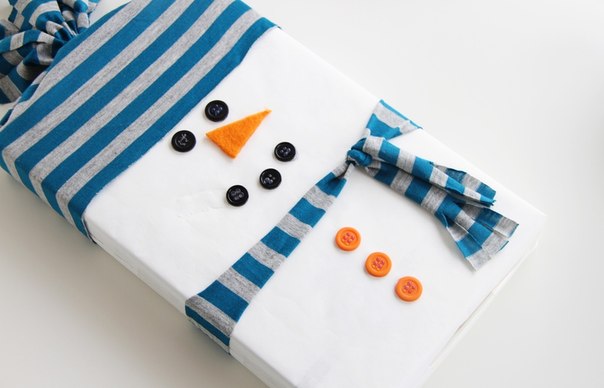
We make and glue a carrot nose from a piece of fabric or colored paper. We also glue black buttons instead of eyes and a smile - we imitate coals.

The buttons on the snowman's clothes can be colored.
An important point: on the back side, you can write a few warm words of congratulations with or (if it is in winter).
Manufacturing workshop new year gift-souvenir "Snowman"
Ananyeva Galina Vladimirovna, educator, secondary school №892
DO # 1, Moscow.
The master class is calculated for older preschoolers, schoolchildren, educators and teachers of additional education.
Purpose: Souvenir gift, interior decoration.
Target: Making a New Year's souvenir gift.
Tasks:
Educational: Teach the technology of making a souvenir gift
Developing: Develop creativity, imagination, artistic taste, fine motor skills and hand coordination.
Educational: to educate accuracy and diligence in the performance of work, caution, perseverance.
Working process
You can choose anything you want as New Year's gifts, but for those close to you, the most expensive gifts will probably be those that you make with your own hands. These can be completely different things: holiday cards, decorative Christmas trees, interior items, topiary decorated with cones and twigs, Christmas candles and toys, knitted items and much more.
If you plan to start preparing New Year's gifts and souvenirs on your own, it is advisable not to postpone it until the last day. It is better to plan everything in advance, because before starting work, you need to carefully think over the list of gifts, based on the hobbies or preferences of your loved ones, as well as prepare all the necessary materials.
I offer you a simple and budget souvenir gift for the new year "Snowman". Remember, whatever you donate, it must be donated from the bottom of your heart. After all, the main thing is not the price of the gift, but the attention!
Necessary materials:

-chocolate bar
- fleece
- album sheet
-fetter red
-simple pencil, eraser, pink colored pencil
-ruler
-gel pen in red
- multi-colored buttons
- eyes for needlework
-scissors
-stationery knife
-glue "Moment"
At the beginning of work, you need to measure the width, length and height of the chocolate bar with a ruler. This is necessary in order to transfer the dimensions to the landscape sheet.


Transfer the resulting dimensions with a simple pencil and a ruler to the album sheet, taking into account the two sides of the chocolate and the space for the allowance.

Cut along the contour with scissors.

On the workpiece, using a clerical knife, make vertical cuts along a pencil line. Attention! Do not cut through to the end! Draw a line with a light touch. This is so that the paper folds easily in the right place.

On the workpiece, erase the pencil lines with an eraser. We bend in the incised places.

Here's a "cover" should be obtained.

Apply Moment glue on the seam line and glue it.

It turns out this rectangle. He puts a chocolate bar in there.

Form a hat for the future snowman from fleece, cut off the required size.

To glue the fleece on the workpiece with Moment glue

Cut off two long and narrow strips of fleece. One will go to form a pom-pom on a hat, from the other we will make a scarf.

We form a pompom. We tie it well, cut off the excess. We make cuts on the pompom.

From the second long piece of fleece we make a scarf for the snowman. We glue with glue "Moment"

Cut out the nose in the form of a carrot from felt. We glue the snowman's nose and eyes.

Draw a mouth with a red gel pen.

We glue the buttons under the scarf.

Pink colored pencil "rouge" the snowman's cheeks.

Earlier, I made a friend of a snowman

Snowman new year greetings
Snowman sends a letter to a friend:
"I wish you a blizzard ...
So that the blizzard is chalk all year ...
Ice, drifts, snow slides,
And frosts "minus forty" ...
And sincere warmth! "
(A. Usachev)
On the magical holiday of New Year, all gifts should be packed unusually, even if it is a simple chocolate bar.
Ordinary chocolates, which are given in packs during the New Year holidays, can be unforgettably decorated by turning into a snowman.
Watch a master class with a video on how to decorate a chocolate bar in the form of a snowman using the materials at hand that can be found in every home.
Everyone can do such a craft for the New Year with their own hands, but the person who is gifted will have a lot of impressions!
What do you need:
- big chocolate bar
- thick white paper (a piece of Whatman paper)
- double sided tape
- pencil
- black gel pen or marker
- orange corrugated paper
- glue "Moment-Crystal"
- Red pencil
- cotton swab
- new bright sock
- needle and thread
When buying sweets and chocolate, look at the expiration date of sweets, it is best to purchase products released not earlier than October, then they will definitely please their excellent taste all sweet tooth.

How to make a new packaging for the "Snowman" chocolate
1. Cut out a piece of paper that is suitable in size to wrap the length of the chocolate and glue on the back.
2. Cover with a strip of double-sided tape, as shown in the video, first securing one side with a piece of tape so that the chocolate does not "ride" inside.
3. Draw on the face of the snowman's eyes, first with a pencil, and then circle with a pen or marker. Alternatively, if you find it in a craft store, glue the "shifty eyes".
4. Make a nose out of orange paper by rolling it up into a tube and twisting the tip of the "carrot". Then roll up the straw a little for more realism and charm of our fairytale hero.
If you don't have such paper at hand, you can use a cloth or just draw a nose. Or print a ready-made face from the Internet.
5. Mark the place for the nose and draw the smile of the snowman with a pencil.
6. Then glue the nose with Moment-Crystal glue.
7. To make a blush on the cheeks, draw boldly with a red pencil on a piece of paper, collect the paint with a cotton swab and rub the snowman's cheeks.
8. For the beanie, trim the toe behind the heel so that the heel stays on the side we will be using.
9. Turn the sock inside out and sew the hole that you got at the cut, as in the video.
10. Tighten the heel to create a pompom.
11. Put a hat on the snowman.
12. For the scarf, cut the rest of the sock in a spiral (in a circle) to make a strip of equal width.
13. Wrap around the bar once or twice and tie.
14. Secure the ends of the scarf with tape. Draw the buttons.
15. Decorate the snowman with shiny fluffy wire (tinsel, rain), attach spruce branches, berries, beads that you have in your house from the New Year's decor.
All is ready! Watch the video.
Ideas for decorating a chocolate bar in the form of a snowman photo


What is an integral part of a children's New Year's gift? Sweets, of course! Surely you, going to visit friends who have a child, bought him chocolate. And if you present it in a special way, having decorated it in the New Year's style, the gift will turn not only into a delicious, but also a fun surprise. A regular chocolate bar can be beautifully packaged by making a snowman out of it. So, he will tell you in detail and consistently how the packaging for the "Snowman" chocolate is made with your own hands, the master class offered below.
To create a festive New Year's packaging for a chocolate bar in the form of a snowman, you will need:
- any bar of chocolate;
- a sheet of white paper;
- PVA glue;
- some orange paper;
- double sided tape;
- a simple pencil;
- black felt-tip pen or gel pen;
- two pieces of fabric for a hat and a scarf;
- stapler;
- paper for buttons.

The procedure for creating New Year's packaging for the "Snowman" chocolate with your own hands
1. Cut a piece out of white paper into which you could wrap the chocolate so that the edges overlap. Instead of snow-white paper, you can use soft blue, but in this case, you need to take a contrasting material for the hat and scarf so that the packaging looks festive.
By the way, you can also make a cute one that can be hung on a Christmas tree. Children will also like this souvenir.

2. We glue the edges of the base of our packaging for "Snowman" chocolate on the back side using double-sided tape. Scotch tape will help us do this as carefully as possible.

3. Using a simple pencil on the front part, draw a funny face without drawing a nose. When everything is drawn correctly, you can circle the sketch with a black felt-tip pen.


4. Make the nose out of a piece of orange paper, roll it up and press it a little. We glue it with glue.

5. We cut out the buttons from colored paper, but when creating a festive New Year's packaging for a chocolate bar in the shape of a snowman, you can turn on imagination and use real buttons, for example. We put them on glue too.
6. Cut out two flaps from the fabric - one for a scarf (longer and narrower), the second for a hat. The width of the fabric for the hat should be such that it fits snugly around the chocolate bar and can also be overlapped.

7. The fabric for the hat on the back side must be fastened with a stapler, the remaining area must be tied with a beautiful tape.

8. Tie a scarf. That's it, the packaging for the "Snowman" chocolate with your own hands is ready, a master class, we hope, will help you create the same one.