Snowman-shaped chocolate. Festive New Year's packaging for a chocolate bar in the form of a snowman
For crafts you will need: any chocolate bar, white paper (A4 sheet for a printer), felt-tip pens, scraps of bright fabric and thread, small black buttons, a small piece of orange felt, as well as other decorative items to taste and desire.
Work order:
1. Wrap the chocolate bar with white paper and secure the paper with a drop of glue.
2. Place small black buttons where the snowman's eyes, mouth and buttons should be. Cut a small triangle out of orange felt and glue it between the snowman's eyes and mouth. You can do it even easier: with a black felt-tip pen, draw the eyes, the smile of a snowman and buttons in the form of large dots. Orange felt-tip - nose in the form of a triangle.
3. Wrap the top of the chocolate bar with a piece of bright knitwear to imitate a snowman's hat. Secure the fabric at the back with a pair of blind stitches or a little glue. Tie the top of the fabric with a narrow strip of the same fabric and cut the top of the "cap" into strips. Where the snowman's neck is supposed to be, tie a narrow strip of the same fabric.
The second way to decorate a chocolate bar is even easier.
On white paper, in which it will be packed, we print a funny face on a color printer (download the drawing from the Internet), and then wrap a chocolate bar in it (make sure that the snowman's face does not slide to one side). In the middle, tie a double knot with several bright woolen threads folded together. On the upper part we glue two rectangles made of black cardboard or felt (the large one is the crown of the hat, the narrow and wide one above the crown is the brim). If desired, you can glue a small button, a bead or a narrow satin ribbon bow on the side of the snowman's hat brim.
By the way, such a chocolate bar in the shape of a snowman can also be used as a kind of postcard - just write a congratulation on the back on the back.
Good children's associations with the New Year are, of course, Santa Claus, Snow Maiden, we have chocolate and very kind. A fairytale house made of chocolate, a chocolate snowman and a chocolate tree will be a great addition to the winter holidays.
New Year's holidays are filled with expectation of a miracle. Sweet chocolate figurines embody fairy-tale dreams, delightful Snow Maidens, Fir-trees, Santa Clauses will decorate the festive evening. Kids and adults will be happy to enjoy Christmas figurines made from delicious chocolate. Colleagues and friends will gladly accept an original themed gift!
We help you with your pre-holiday cares and guarantee a fresh chocolate gift delivered on time. Each figurine is its own author's design, it is not replicated, which means that the chocolate animals will be an original gift.
We bring to your attention a quick and effective solution of chocolate gifts for every holiday of the year. We can offer you ready-made chocolate figures, you can also create an original individual gift from chocolate. We will make an order for an original chocolate figurine in individual packaging with high quality and on time.
On the site in the section "Chocolate figures" you will find a large selection of chocolate figures with photographs, detailed descriptions and prices depending on the circulation and type of chocolate. Advanced search, available on all pages of the catalog, will help you find all possible options for a chocolate gift on the subject of the Holiday, in accordance with the required dimensions.
We work all over Russia, we ship by all types of transport. Detailed information about each chocolate product in the catalog contains information about the price and delivery time, depending on the circulation and production characteristics.
for balls - basics
100 g walnuts
10-15 pcs. tonsils
100 g dried apricots
50 g raisins
100 g prunes
some cinnamon to taste
100 g white chocolate to cover
+ about 50 g of white chocolate for decoration(undoubtedly less will be required, but it is better to let the extra remain than it will not be enough)
+ 100 g dark chocolate and 20 g (1 full tablespoon) honey for mastic
A dash of dark chocolate for garnish
+ colorful sugar balls, sprinkles, etc. for decoration
Parchment paper, paint brushes (high quality! So as not to leave hairs on the surface)
Making the basis:
Grind the nuts into small crumbs in a blender. Separately grind the dried fruits with a blender until smooth (if they are poorly chopped, you can add a drop of water, but just a little!).
Mix chopped nuts and dried fruits in a bowl with your hands. Roll balls of the required size from this mass. If there is excess weight left, you can make candy balls out of it, roll in cocoa or sesame seeds and eat ...

Melt white chocolate in a water bath:
chop it into pieces, put it in a saucepan and place it in a larger saucepan with water, but so that the bottom of the saucepan with chocolate does not touch the water! Put on a small fire. Once the chocolate begins to melt, turn off the heat and stir until the chocolate is completely melted.
For tempering: put a bowl of liquid chocolate in the freezer until the chocolate begins to solidify (it should not become completely hard, but just start to freeze). This happens very quickly, literally in a few minutes, so check the chocolate!
Then melt it again in a water bath, as described above. Dip balls into melted chocolate and place on parchment paper to set. You do not need to put it in the refrigerator.

After hardening, glue the balls-heads to the balls-body with chocolate. It is good to close the place of their connection with chocolate, smearing it with a brush.

Making mastic:
On our site, a lot has already been written about mastic, but I will still tell you how I did it, what if it will come in handy for someone ... I did it for the first time, so if I did something wrong, correct me .. ...
Melt the dark chocolate in a water bath, add honey there and stir with a spoon until the mass is easy to separate from the sides of the bowl.

Take it in your hands and knead it properly, knead it thoroughly with your hands. A lot of oil will come out, so it's best to do this over a bowl. If the mastic cracks and crumbles during kneading (as in the first photo), this means that you need to add a little more honey (for this, I warmed up the mastic a little again).
The finished mastic (for 2-4 photos) is very plastic.

After cooking, it must be wrapped in foil and put into the refrigerator for at least an hour.
Before work, the mastic needs to be slightly warmed up and kneaded again with your hands. I don't have a microwave, so I just kneaded it until it was warm and soft and pliable.
We dress snowmen:
Scarf- roll a long mastic sausage. Squeeze it with your fingers to make a flat tourniquet. This tourniquet is to "put on" the snowman, cross the ends, cut off the excess. Mark the place of the "knot" on the scarf with a knife.

Beanie- make a rounded hat out of a piece of mastic, attach it to the snowman's head. Make a small flat flagellum (as we did for the scarf), attach the caps along the contour at the bottom. Roll a pompon from a small piece of mastic and attach.

Hands- Roll up a small sausage and cut into two parts. At the end of each sausage, make an incision with a knife - this will be a finger, slightly round it. Give the handles a slightly rounded shape and attach to the body. Do not be alarmed that the snowman's hands are dark, we will paint them later ...

The basis of the hat for the "girl"- cut a thin circle out of the mastic. Roll along its edge with a stick to make the edges thinner and full. Attach this circle to the head, gently press with your finger in the center, form waves along the edge.

The dress- roll a long mastic sausage, divide into equal parts. From each part, pressing and stretching with your fingers, make a drop shape. Roll along the edge of the drop from the wide side with a stick to fill it (as we did with the base for the cap).

Attach these drops to the body one by one, slightly overlapping. Form waves along the bottom with your fingers. Make the handles in the same way as described above.

Vest- roll out a long flat strip of mastic, cut off the excess rounded edges (try it on a snowman to cut off the excess).
Wrap the strip around the snowman so that it fits snugly on the widest part of the body, but the ends in front do not converge. And near the head, she should sit freely, and the ends should converge.

Cut out small triangles along the top of the vest with scissors (you get a kind of "darts" that will help the vest "sit" better). You can cut out as many triangles as necessary to evenly "fit" the vest on the snowman with your fingers. The contacting ends of the vest strip must be bent to form a collar. You can leave it that way, or you can also cut out the triangles on the collar with scissors (see the fourth photo).
A hat-cylinder for this snowman can be made from a circle of mastic and a small piece of cylindrical mastic can be attached to it on top.

Now that all the snowmen are dressed, it remains to melt some more white chocolate, keep it warm so that it does not freeze, and use a brush and colored sugar to decorate the snowmen.
I'm sorry, but I don't have detailed photos of how I decorated them. There was simply no longer the strength to photograph anything else.
But I think that everything will be clear here, looking at the finished figurine.
Snowman in a vest
Circle the vest around the contour with white chocolate, sprinkle with sugar balls (just press them into the mastic). On the hat - a strip of white chocolate sprinkled with sugar balls. Eyes made of brown sugar balls, or you can just draw them with dark chocolate, put a white dot on the side. Draw the mouth and eyebrows with dark chocolate. Paint the upper part of the hands with white chocolate, leave the lower one brown. The result is handles in mittens!
Master class on making a New Year souvenir gift "Snowman"
Ananyeva Galina Vladimirovna, educator, secondary school №892
DO # 1, Moscow.
The master class is calculated for older preschoolers, schoolchildren, educators and teachers of additional education.
Purpose: Souvenir gift, interior decoration.
Target: Making a New Year's souvenir gift.
Tasks:
Educational: Teach the technology of making a souvenir gift
Developing: Develop creativity, imagination, artistic taste, fine motor skills and hand coordination.
Educational: to educate accuracy and diligence in the performance of work, caution, perseverance.
Progress
You can choose anything you want as New Year's gifts, but for those close to you, the most expensive gifts will probably be those that you make with your own hands. These can be completely different things: holiday cards, decorative Christmas trees, interior items, topiary decorated with cones and twigs, Christmas candles and toys, knitted items and much more.
If you plan to start preparing New Year's gifts and souvenirs on your own, it is advisable not to postpone it until the last day. It is better to plan everything in advance, because before starting work, you need to carefully consider the list of gifts based on the hobbies or preferences of your loved ones, as well as prepare all the necessary materials.
I offer you a simple and budget souvenir gift for the new year "Snowman". Remember, whatever you donate, it must be donated from the bottom of your heart. After all, the main thing is not the price of the gift, but the attention!
Necessary materials:

-chocolate bar
- fleece
- album sheet
-fetter red
-simple pencil, eraser, pink colored pencil
-ruler
-gel pen in red
- multi-colored buttons
- eyes for needlework
-scissors
-stationery knife
-glue "Moment"
At the beginning of work, you need to measure the width, length and height of the chocolate bar with a ruler. This is necessary in order to transfer the dimensions to the landscape sheet.


Transfer the resulting dimensions with a simple pencil and a ruler to the album sheet, taking into account the two sides of the chocolate and the space for the allowance.

Cut along the contour with scissors.

On the workpiece, using a clerical knife, make vertical cuts along a pencil line. Attention! Do not cut through to the end! Draw a line with a light touch. This is so that the paper folds easily in the right place.

On the workpiece, erase the pencil lines with an eraser. We bend in the incised places.

Here's a "cover" should be obtained.

Apply Moment glue on the seam line and glue it.

It turns out this rectangle. She puts a chocolate bar in there.

Form a hat for the future snowman from fleece, cut off the required size.

To glue the fleece on the workpiece with Moment glue

Cut off two long and narrow strips of fleece. One will go to form a pom-pom on a hat, from the other we will make a scarf.

We form a pompom. We tie it well, cut off the excess. We make cuts on the pompom.

From the second long piece of fleece we make a scarf for the snowman. We glue with glue "Moment"

Cut out the nose in the form of a carrot from felt. We glue the snowman's nose and eyes.

Draw a mouth with a red gel pen.

We glue the buttons under the scarf.

Use a pink colored pencil to "rouge" the snowman's cheeks.

Earlier, I made a friend of a snowman

Snowman new year greetings
Snowman sends a letter to a friend:
"I wish you a blizzard ...
So that the blizzard is chalk all year round ...
Ice, drifts, snow slides,
And frosts "minus forty" ...
And sincere warmth! "
(A. Usachev)
If you think about it, any little thing can be an incredible gift. Much depends on how you present it and beat it. The originality and non-standard approach is extremely important. Even such a trifle as a chocolate bar can become a real masterpiece.
Therefore, we will tell you how to make a package of Snowman chocolate with your own hands - very unusual, fun and festive!
With such funny snowmen, you can please your loved ones, friends of colleagues and everyone, everyone, everyone else in the upcoming New Year holidays, weekends and holidays. Moreover, everyone loves chocolate, and such packaging is very simple.
First, wrap a chocolate bar or a box of chocolates in a white sheet of paper and secure with glue or tape - this is the base, the body of the snowman.
Now let's start making clothes for packing the Snowman chocolate. We need a little of any kind of matter. You can use an old T-shirt, dress, or scarf. In our example, a vest is used.
We wrap the top of the snowman with a cloth. We fasten the edges. We wind the fabric on top - we get a cute hat. Now we cut the fringe on top with scissors, as shown in the figure.


We make a belt from a thin strip and tie a chocolate bar in the middle.

We make and glue a carrot nose from a piece of fabric or colored paper. We also glue black buttons instead of eyes and a smile - we imitate coals.

The buttons on the snowman's clothes can be colored.
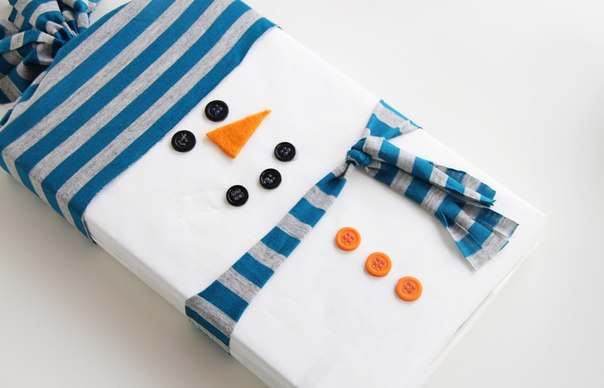
An important point: on the back side, you can write a few warm words of congratulations with or (if it is in winter).