KFC twister recipe. Cooking Recipe Culinary Twister as in "KFC" Food Products
Sometimes you really want to pamper yourself with fast food. Well-known companies offer many quick dishes, but not all of them are healthy, although they have a very rich and pleasant taste. That is why many began to cook fast food at home with their own hands, in order to be completely confident in the naturalness of the finished products. One such product is the KFC twister. It is very easy to make it in your own kitchen from the simplest ingredients.
The calorie content of this food is about 215 kcal per 100 g, so you should not eat it too often. Consider how to make a twister as in kfc step by step with photo.
A detailed step-by-step recipe for a twister as in FSC

This instruction includes the process of making a twister from tortilla to filling.
You will need:
For the cake:
- 30 g softened butter;
- 230 g wheat flour;
- A teaspoon of salt;
- 120 ml hot water (temperature about 60 degrees).

For the sauce:
- A teaspoon of balsamic vinegar;
- 3 tablespoons mayonnaise with lemon juice;
- A tablespoon olive oil and soy sauce;
- Salt and pepper to taste.
For vegetable filling:
- 10 gherkins;
- Lettuce forks;
- One Bulgarian pepper;
- Greens.

For nuggets:
- 4 tablespoons of flour and bread crumbs;
- 2 eggs;
- 2 chicken breasts;
- 2 tablespoons of mustard and mayonnaise with lemon juice (for the marinade);
- Pepper and salt;
- Vegetable oil for frying.

Detailed recipe for twister from kfc:
- The classic version of the snack provides for the presence of strips. But this recipe includes nuggets. To prepare them, first ourselves marinate chicken breast fillets in a mustard-mayonnaise mixture, seasoned with salt and pepper;
- For the tortilla dough, combine and grind flour and melted butter into crumbs. Pour hot water, add some salt. Knead not sticky, soft dough mass, place in a deep bowl, cover with a towel and leave to “rest” for half an hour;
- Divide the dough that has arrived in time into 8 equal "koloboks", each of which is rolled into a cake a couple of millimeters thick. We bake each piece in a dry hot frying pan for two minutes on each side, setting a medium flame. We quickly wrap the baked products in a bag so that they do not lose their softness;
- For the sauce, combine all the products from the list and knead until smooth;
- Pour flour into one bowl, beat eggs with a pinch of salt in another, pour bread crumbs into the third. To make the dish even more tasty and aromatic, croutons can be combined with finely chopped garlic and a mixture of peppers;
- Warm up a frying pan with vegetable oil. Dip the marinated chicken fillet in turn in the contents of each bowl (in the same sequence as above) and fry for 5-7 minutes on each side until a golden crust appears on the meat. Put the finished nuggets on paper napkins to get rid of excess fat;
- V vegetable filling chop the gherkins and peppers into thin strips, finely chop the greens, leave the lettuce leaves whole;
- Now we are assembling our twister at home. We generously coat the tortilla with sauce, put a lettuce leaf on it, and place vegetable filler and meat on top of it.

We fold the product into a roll and serve it to the table.
Simple homemade twister recipe
For cooking, the most common products that can be found in all stores are used.
Ingredient List:
- 4 Armenian yeast-free lavash;
- 200 g Chinese cabbage;
- 2 tomatoes;
- 400 g chicken fillet;
- 100 g of hard cheese;
- Spices to taste.

Cooking scheme:
- Cut poultry into slices, rub with spices and lightly fry;
- Cut the tomatoes into slices, separate 4 cabbage leaf off the plug;
- We form our appetizer: put the chicken on the pita bread, then a leaf of Peking cabbage, on top of tomato slices. We finish the composition with grated cheese;
- We fold the product in the form of an envelope.

On this homemade fast food is ready. You can use it in this form, or put it in the oven for a couple of minutes to melt the cheese. You can also use the microwave for this or lightly fry the twister in a pan.
I-twister cheese
The Ay Twister is one of the most famous KFC fast foods. This company regularly comes up with new varieties, but perhaps the most popular is the cheese i-twister.
You need:
- A couple of lettuce leaves and tomato slices;
- 2 chicken nuggets or one corn-breaded strip;
- Tortilla flatbread;
- 50 g of cheese;
- Cheese sauce, ketchup and mayonnaise.

Cooking process:
- In KFS, cheese dough is used for a special tortilla. But we'll take a regular tortilla. We lay it out on the table, put lettuce leaves on top;
- We melt the cheese in the microwave and put it in the next layer;
- Then there are chicken and tomatoes drizzled with cheese dressing;
- We wrap the product in an envelope and enjoy the amazing taste.
Asian twister
This original appetizer will delight you with crispy chicken breast with the perfect combination sweet and sour sauce, ginger and bacon, and the piquant taste will appeal to all guests.
Required components:
- 2 pita bread;
- 200 g of chicken fillet and lettuce leaves;
- 100 g pickled ginger;
- 50 g bacon or salami;
- 50 g sesame seeds;
- 4 large spoons sweet and sour sauce.

Homemade twister recipe:
- Cut the chicken fillet into small pieces, pan and fry until golden brown;
- Let's do the same with bacon slices (but if you take sausage, then you do not need to fry it);
- Cover the surface of the pita bread with chicken, lettuce, bacon, pour the sauce;
- Arrange the pickled ginger slices, sprinkle with sesame seeds and wrap the twister.
As an experiment, you can add different fresh vegetables, cheese, seasonings.
"Lazy" twister
it quick meal done on hastily, and the main ingredients - tortilla and nuggets can be bought ready-made.
Products composition:
- 2-3 tomatoes;
- 4 Mexican tortillas (tortilla);
- A bunch of lettuce;
- 14 pieces of chicken nuggets (or pack);
- Mustard, mayonnaise.

How to make a twister like in CFS:
- We will heat the nuggets in the microwave, but the best option would be to fry them in a pan;
- Cut the washed tomatoes into cubes, wash the salad and chop them in the same way;
- We will heat the cakes (there is an explanation on the back of the package how you can do this). Can be heated in the microwave at 650 W for 15 seconds;
- Let's start collecting delicious fast food: grease the cake with mayonnaise (if you like it sharper, add mustard), put a strip of tomatoes in the middle, but not until the end of the tortilla. You need to leave a place to wrap the workpiece well;
- Put the salad on the tomatoes and put the nuggets on the sides of the tomatoes. The “strong half” can put 4 chicken products in fast food so that the man more than satisfies his hunger, and the “weak half” - 3 nuggets;
- We wrap our culinary miracle in this way: first one side, then fold the bottom and then the other side.

You can experiment with the filling as you like. It is better to make delicious fast food with than with pita bread, because it absorbs tomato juice and mayonnaise dressing a lot, and then it can fall apart. And the cake remains "in in the best possible way"Even after a day.
Twisters will serve you as a great snack on a trip, at work, on a hike, on the road.
Video: KFC Twister Recipe
Thursday, July 12, 2018 13:49 + in the quote pad
Sometimes you really want to pamper yourself with fast food. Well-known companies offer many quick dishes, but not all of them are healthy, although they have a very rich and pleasant taste. That is why many began to cook fast food at home with their own hands, in order to be completely confident in the naturalness of the finished products. One such product is the KFC twister. It is very easy to make in your own kitchen from the simplest ingredients. The calorie content of this dish is about 215 kcal per 100 g, so you should not eat it too often. Let's see how to make a twister like in kfc step by step with a photo.
| Categories: | |
Simple home recipe twister
For cooking, the most common products are used, which can be found in all stores.
Ingredient List:
4 Armenian yeast-free lavash;
200 g of Chinese cabbage;
2 tomatoes;
400 g chicken fillet;
100 g of hard cheese;
Spices to taste. 
Cooking scheme:
Cut poultry into slices, rub with spices and lightly fry;
Cut the tomatoes into slices, separate 4 cabbage leaves from the fork;
We form our appetizer: put the chicken on the pita bread, then a leaf of Peking cabbage, on top of tomato slices. We finish the composition with grated cheese;
We fold the product in the form of an envelope. 
On this homemade fast food is ready. You can use it in this form, or put it in the oven for a couple of minutes to melt the cheese. You can also use the microwave for this or lightly fry the twister in a pan.
Twister rules.
Twister is a game that ties you into knots. The one who stands last wins.
A step-by-step guide on how to make a twister game yourself, the rules of the twister game, a photo twister game, and tips for buying a twister game for the lazy.
What is Twister?
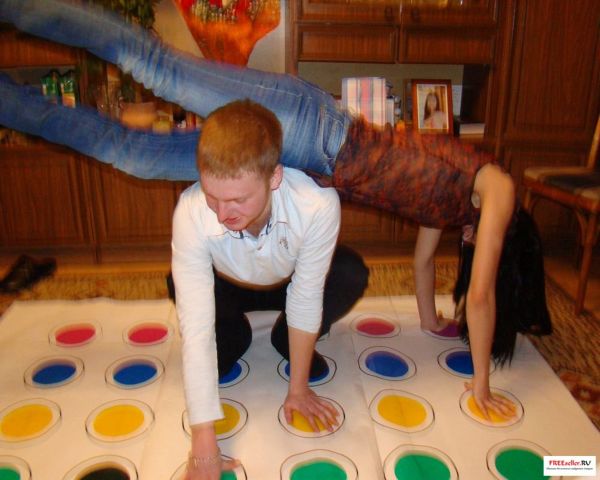
The twister is played on a large plastic mat that is spread out on the floor or on the ground. The size of the mat is 150x180. This mate is like a board game. It has four rows of six large colored circles: red, yellow, blue, and green. The roulette wheel is attached to a square board and serves as a dice in the game. The tape measure is divided into four marked sections: right foot, left foot, right hand, and left hand. Each of these sections is divided into four colors (red, yellow, blue, and green). After the spin, a combination is called (for example: right hand to yellow) and the players must move their corresponding arm or leg to the point of the correct color. In a two-player game, both people cannot place an arm or a leg in the same circle at the same time. The rules are different for more people. Due to the lack of colored circles, players will often be required to place themselves in awkward or unstable positions, which will ultimately lead to someone falling over. A person is eliminated if they fall or when their elbow or knee touches the mat. There is no limit on the number of players playing at the same time, but more than four are already barely included.
The history of the game twister
The twister was proposed for patent by Charles F. Foley and Neil Rabens in 1966, but this was not successful until Eva Gabor played it with Johnny Carson on the Tonight Show on May 3, 1966. Although Twister was patented by Charles F. Foley and Neil Rabens, sources also mention a man named Reyn Guyer. He claimed to have come up with the idea for Twister while working for Johnson's Shoe Polish promotion at his father's company. Guyer is said to have originally named this idea for a new game Pretzel, but that Milton Bradley changed the name to Twister before they launched the game to market. However, the claim that Reyn invented the Twister appears to be a lie. According to the US Patent Office, there is no connection between the twister and the Guyer name. Foley and Rabens are considered inventors and are the only names associated with this patent. Their only connection with Guyer is that they were employees in his father's company.
A step-by-step guide to making a DIY game
To make a Twister game we need:
2 sheets of Whatman paper,
Self-adhesive film in four colors - red, yellow, green, blue (you can use colored paper and glue or paints and big piece transparent polyethylene).
Compass,
Scissors,
Pencil,
Ruler,
Cardboard size 30x30 cm,
Flat hat button,
A thin wooden stick (this device is necessary if there is nowhere to take a ready-made arrow).
Making the game
From whatman paper, you will need to glue the base for the game with a twister approximately 1x1.5 m in size using adhesive tape.
The finished base must be drawn into cells: for 4 circles horizontally, you need to draw 5 cells, for 6 circles vertically, you need to draw 7 cells. This way we get the centers of our circles.
Next, you need to cut out the circles themselves from self-adhesive colored film (or colored paper). The diameter of the circles should be about 20 cm, but in order to save material, you can make 15-18 cm each. Glue the cut circles to the base, aligning the hole from the compass on the circle with the corner of the cage. If we use paint for the circles, then first they need to be drawn with a compass on the base. After painting, you need to stick polyethylene on the game, otherwise the mugs will get dirty.
Rice. 1 The basis for playing a twister.

Rice. 2 The basis for playing a twister.
4) Now you need to make a dial by which the presenter will determine the actions of the players. The cardboard needs to be divided into 4 parts and each part also into 4. From the scraps, you need to cut and paste, alternating, colored triangles on the cardboard (or paint with paints). On 4 pieces of cardboard you need to write: right hand, right leg, left hand, left leg.
Or if you are too lazy to draw, you can type a twister in Microsoft Word, for this we make 4 files with a paper size of 15 x 15 cm.Insert circles with a diameter of 5 cm.

Fig. 3 Making a dial for a twister. Inserting circles
We fill the circles of the dial for playing the twister.

Fig. 4 Making a dial for a twister. Filling circles.
Insert a picture of an arm and a leg, and write using a Word Art object: "Left hand", "Right arm", "Left leg", "Right leg"

Fig. 5 Making a dial for a twister. Left hand.

Fig. 6 Making a dial for a twister. Right hand.

Fig. 7 Making a dial for a twister. Left leg.

Fig. 8 Making a dial for a twister. Right leg.
We print pictures on a color printer, and cutoffs.

Fig. 9 Making a dial for a twister. We print and crop the pictures of the dial.
We take a cardboard base for the twister dial.

Fig. 10 Making a dial for a twister. Cardboard base of the dial.
We glue the cropped pictures to the cardboard base of the twister dial.

Fig. 11 Making a dial for a twister. We glue the pictures to the cardboard base.
We get, here is such a square, which can be cut exactly according to the pictures, or you can leave it as it is

Fig. 12 The dial for the twister is almost complete.
5) Now the most difficult thing is the arrow. With the button on the back side in the cardboard we pierce a hole, so that the button does not interfere with the cardboard standing, without staggering. You need to make a hole in a wooden stick (you can use the leg of a compass), while you need to constantly "try on" the arrow on the button so that it is suspended, but does not fall and rotate freely. If the arrow is tilted, then you need to stick a little scotch tape at its end for balance.
You can make an arrow using chopsticks Japanese food and a button, and if they are not at hand, take a regular pencil.

Rice. 13 Hand for twister dial.
That's all! The game is ready! :)
You can also use a dice for playing Twister and a rug(can be printed on a plotter), which were kindly provided by our reader Ksenia Plakhotnyuk, from Karaganda, Kazakhstan.
(save cuts, print and glue) -

Twister rules
Spread the base of the twister on the floor and lay the dial on a flat surface.
Initial positions
2 players: Stand opposite each other, on the small side of the base, on the blue and yellow circles.
3 players: 2 players stand opposite each other, on the small side of the base, on the blue and yellow circles. The third player stands in the middle on 2 red or 2 green circles.
4 players: 2 players stand opposite each other on the small side of the base on the blue and yellow circles. The third player stands in the middle on 2 red, player 4 opposite him on the green circles.
It is also advisable to have an additional player, the leader, who will turn the dial, and the players on the base will take turns to move, or immediately who will have time (depending on the type of game you choose)
For example, if your company has 5 people, 4 people can participate on the basis of the game, and the 5th one will turn the dial, the last one who resists on the basis will be the leader in the next round.
How to play
2 players: Take turns to announce the move without using the dial. If you want to arrange a game of picking-ups - arrange it.
More than 2 players: Choose a leader to twirl the dial and announce the movements of the players, Stand in the starting positions.
More than 4 players: Squeeze additional players where you can or split into teams and play the Twister Championship.
So:
The presenter turns the dial, announces the color and which arm or leg a certain player needs to move .. For example: Sasha - his left hand is red.
All players must complete this move as quickly as possible.
Rules of the game
Only one arm or leg for 1 circle. The first player to reach takes a circle. If you cannot agree on who reached first, the presenter decides. The leader's decision is not subject to excuse.
As soon as you have made your move, you can no longer move, except for the cases when the presenter gives you permission to do so in order to miss the arm or leg of another player.
If all 6 circles of the same color are occupied, the presenter turns the dial again.
If the presenter announces a hand / foot and color combination that you are doing, you must move your arm or leg to another circle of the same color (If all 6 are occupied, the presenter turns the dial again).
If a knee or elbow is placed on the base, or if you don't hold, you are eliminated.
Homemade Twister Photo Game


Other ways to play twister
Twist queue
Try in turn to perform the movements announced by the leader, for example, the first time the dial is believed for the first player, the second for the second player, etc. so you will twist everything in different ways and you can weave so that it does not seem a little.
Division into teams
Lots of people wanting to play twister? No problem. Divide into teams (preferably in pairs). Members of the same team can share the same circle. As soon as one player falls, or touches the base with his knee or elbow, the other team wins.
Twister Championship
In this game, teams play against each other. Keep track of wins and losses to find out which team won.
Twister for departure
Try playing the fly-out twister. The winning team stays on the base and gravitates towards new opponents until all teams have played. The last standing team wins.
If you want to play Twister, but for some reason you don't want to do it yourself, you can buy the game.
The purchased box version is more convenient to use, it can be transported over distances, taken to friends or relatives. For example: play set Hasbro's Twister "


Alexander Borisov, Samara
Many fishermen use a twister for fishing. A twister is a lure that has a flexible body with a sickle on its tail.
The bait has a number of advantages:
- The flexible body resembles a small fish and completely imitates it.
- Low cost.
- Huge selection of different twister shapes.
- It is possible to mount on various accessories.
- It can be used in any water horizon.
- Thanks to its design, the twister has the ability to move through algae and rocky bottom.
Twisters are used to catch predatory fish: perch, pike, pike perch and catfish.
Preparation phase
We decide on materials, shape, size
Molds for future baits can be purchased in stores, but you can also make yourself.
Form making first option:
- To make a mold, you need to prepare a small box or a frame for ebb, plaster, lures, on which future twisters will be cast.
- Preparing the frame. It can be made from metal, cardboard, wood.
- We install it on a flat surface.
- We put the bait.
- Fill with plaster. You may not fill the frame completely. The main thing is to cover the prototypes.
- After the plaster has dried, removes the plaster from the frame, take out the bait. The form is ready.
Making the form the second option:

- For work, you need to prepare: wood, cardboard, gypsum, polystyrene, plasticine.
- We make the body of the future bait from wood. With the help of a file, we give the required shape.
- Cut out the future tail from cardboard required thickness.
- We take a piece of styrofoam. We immerse the workpiece halfway into it. We strengthen it around the perimeter with plasticine.
- With the help of cardboard we make the formwork. Securing the joints with plasticine or other material.
- Fill with plaster and let dry. The first half is ready.
- Repeat the previous steps and make the second part of the form.
- Let the forms dry completely. You can leave them on the battery for a few days.
- Then we cover it with epoxy. In this case, the form must be hot. Cover in several layers until the epoxy stops absorbing. After which a glossy surface will appear, the form will become more durable.
How to choose silicone for baits? There are two options:
- Old spoiled baits can be used. They can be melted and made new. The color is a huge plus. When melting, all colors are mixed and a new shade appears.
- You can buy special silicone for making baits. It is sold colorless. To give any shade, you must additionally buy special dyes and glitters. In terms of cost, it will be cheaper.
We prepare the necessary tools and materials
Before starting casting, you must:
- Prepare the casting mold.
- Determine the choice of rubber and prepare it.
- Prepare utensils for melting rubber.
- Prepare a water tank.

How to prepare silicone
After preparing the instruments, the silicone must be melted. The result should be rubber in a liquid state.
There are several ways to melt:
- On an open fire. This is the most quick way... However, this is the only plus. With this method, the silicone melts very quickly and begins to smoke, burn, and change color.
- The most acceptable way is melting in a microwave oven. Can be melted in a bowl or syringe. The first method is acceptable if several people or many molds are involved in casting. The second method is used to exclude any fumes.

Which syringe to choose
The syringe and melting cup are the basic of the casting tools.
Types of syringes:
- Plastic medical syringes. Better not to use. There are many known cases when such syringes melted under the influence of high temperature and inflicted burns on people.
- Glass syringes. The advantage of such syringes is the ability to control the silicone melting process. Minus - glass is a fragile material. When exposed to even the smallest load, there is a possibility of breakage of such a syringe. They can also explode. As a result, a person can also suffer.
- Fluoroplastic syringes. it the best way... They do not break when dropped and have a special heat capacity. In this syringe, the rubber stays in a liquid state longer.

Manufacturing instruction
When the form, tools and silicone are ready, you can proceed directly to the manufacture of the bait. The process itself is very simple:
- We collect rubber into the syringe. If the silicone was prepared in a syringe, then you can proceed to the second point.
- Make sure there is no excess air. Otherwise, the bait will turn out to be heterogeneous, that is, with bubbles.
- Place the mold in the required position and fill with silicone. Some have air vents. It is necessary to fill in the form monotonously until the silicone appears from the duct.
- Turn the mold upside down and continue filling with silicone. Changing the position of the mold will prevent voids from forming in the silicone fish.
- Wait a few minutes to cool the silicone.
- Extract the finished bait. Place in a container with water. You can also put some ice cubes there. This will allow the silicone to cool faster.
- The fish is ready and you can try it in action.
Twisters are most often used with a jig head. In this case, they drown and burrow into the muddy bottom. To avoid this, this twister can be tuned. For this, foam is used.

The first way
- Prepare your hook, styrofoam, scissors.
- Cut off half of the body of the bait.
- Put on the hook.
- Use the styrofoam to cut a piece of the bait. Put some foam on the free part of the hook.
- The bait is ready.
Second way
- Prepare a twister, utility knife, styrofoam.
- Use a clerical knife to open the belly of the fish.
- Cut a small piece from the foam.
- Place this piece in the belly of the fish.
- Cover with glue.

- Gypsum should be diluted with water in a ratio of 1: 3.
- When making a mold, wire can be placed in prototypes. This will allow you to maintain the correct shape of the future fish.
- Plaster hardening time is approximately 12 hours.
- Curing time silicone 3-5 minutes.
- After the plaster has hardened, all the irregularities in the shape can be corrected. To do this, use a knife or skin.
- For quick melting of old baits they must be cut into the smallest pieces.
- It is better to use thermal gloves when working.
- Silicone should be melted at a power of 600 watts.
- The melting process must be constantly monitored. Since rubber is very easy to spoil. It is better to melt silicone in a transparent container.
- It is necessary to melt the silicone to the state not very liquid jelly.
- When using a two-piece mold, unnecessary parts may form along the contour of the fish. They are easy to remove with scissors. And the leftovers can be used for further manufacturing.
- With the help of tin lids and an iron, you can make a tail for a fish. To do this, place the cut silicone between the lids and cover with an iron. Bring the rubber to melt. This takes approximately 15 minutes. As a result, you can get a uniform "pancake". You can make a twister from it.
- All precautions must be followed: work in a ventilated area and protect all exposed parts of the body.
- Store the made twisters in separate containers. Otherwise, they will stick together and may change color.
- On the finished bait, you can apply a drawing with a waterproof felt-tip pen. If you put red dots, then the predator will think that the bait is wounded and weak. If you draw vertical black lines, then the fish will think that this is not a bait, but a small perch.
- A broken twister can be fixed. To do this, heat two parts of the bait under an open fire and connect tightly.
- Finished fish can be immersed in a mixture of salt and attractant. This will give the rubber a scent, which will allow you to catch more fish.
- When crafting, it is better to use bright colors and mix them.
- The cost of such baits is small. That's why self-production lures only make sense if you want to make something of your own and special.
What do you need:
chicken fillet- 200 g
mayonnaise
thin cakes made from wheat flour - 2 pcs.
iceberg salad - 50-70 g
medium tomatoes - 2 pcs.
For breading
salt to taste
flour - 2 tbsp. l.
egg - 1 pc.
What to do:
1. Cut the chicken fillet in two. If desired, breaded by dipping in a beaten egg and then in flour, seasoned to taste with spices and salt. Fry the fillets in vegetable oil over high heat in a skillet, about 3-4 minutes on each side, until golden brown. Or deep-fry.
2. Wash vegetables and dry thoroughly. Cut the tomatoes into cubes. Chop the lettuce leaves or tear gently.
3. Assemble the sandwich. Grease each tortilla with mayonnaise, put chopped lettuce and tomatoes, and on top - chicken fillet. Roll up the cake with an envelope or straw.
4. Optionally grill the sandwich or bake in a toaster until it is browned and crispy.
Cooking Twix!
Ingredients:
Butter - 400g
Flour - 2 cups
Sugar - 0.5 cups
Condensed milk - 2 bananas
Milk chocolate - 300 g
Preparation:
1. Cut the butter into cubes (set aside 3 cubes for the caramel mass), add flour, sugar, you can still half a teaspoon of salt ... mix everything, it is best to use a blender, it will be much easier and faster!
2. Here's a crumb turned out, now pour this crumb into a mold .. well tamp, level. We put in the oven at 180 degrees. for 20 minutes.
3. Now we will cook the caramel mass in a frying pan! To do this, put 3 cubes of butter, pour out 2 cans of condensed milk. We put on fire and begin to boil until a caramel mass is formed
4. The mass begins to thicken! And you're done! (about 20 minutes for our caramel mass to cook)
5. Spread the mass on a completely cooled cake and level it well! Like this:)
6. We heat the chocolate in the microwave or in a water bath. I had 2 dessert tiles and 1 milk chocolate... Pour the chocolate on top of the caramel ...
... well leveled and put in the refrigerator for complete hardening.
7. Now take out ... cut ... and enjoy!
Crispy chicken sticks
Ingredients:
2 chicken breasts, ½ cup flour, 2 eggs, 125 g bread crumbs, 60 ml vegetable oil, salt and pepper
Preparation:
1. First, rinse the chicken breasts under cold water and then wipe them dry. Then, cutting each breast separately, wrap one, and then the second breast in plastic wrap to begin with. Use a meat mallet to beat the breast as thin as possible.
2. Cut the broken breast into thin strips of equal width. And leave for a while on
plate, sprinkle with a little salt.
3. Pour flour into a separate plate, pepper and salt (about ½ teaspoon of salt). In the other, beat 2 eggs lightly, and in the third, pour in the bread crumbs.
4. Each individual piece must first be dumped in flour. Then dip in an egg
5. And at the end "redeem" in breadcrumbs.
6. Prepare the pan. Pour in the oil and start heating it over medium heat.
Cook each side for 2-3 minutes and remove from heat.
Kurnik
Ingredients:
For filling:
Minced chicken - 500 g
Minced veal - 500 g
Ground coriander - 1 tablespoon
Dry herb mixture - 1 tablespoon
Zest of 2 oranges
Ground ginger - 2 teaspoons
Salt - 2 teaspoons
Chicken fillet - 500 g
Fresh red currant - 200 g
Ground pepper - to taste
1 egg, beat
Jelly for jellied - 1.25 cups (diluted in accordance with the instructions on the package)
For the test:
Flour - 4 cups
Butter - 140 g
Salt - 1 teaspoon
Milk + water - 2/3 cup
Preparation:
1. Heat the oven to 175 degrees. In a bowl, combine the veal and minced chicken, coriander, dry herbs, orange zest, ginger, salt and pepper.
2. Sift flour together with salt. Heat butter and milk until boiling. Remove from heat and cool slightly.
3. Add this mixture to flour and knead the dough. Lay it out on a work surface and knead it with your hands. Cut 1/3 of the lid dough, wrap in plastic wrap and store in a warm place.
4. Roll out the rest of the dough on a floured board. Line the bottom and sides of the baking pan with rolled dough. Thinly slice chicken fillet, beat off. Put half of the filling in the prepared form. Cover with a layer of beaten fillet (half), red currant (without petioles) and fillet again (rest). Place the rest of the filling on top.
5. Roll out the remaining dough, brush the edges of the dough with a beaten egg and secure the "lid". Cut off excess dough and use it to make pie decorations. Make a hole in the middle of the "lid", secure the petals. Brush with beaten egg on top and bake for about 2 hours. If the cake turns brown quickly, cover it with foil.
6. When the cake has cooled down, pour the diluted jelly jelly through the hole in the "lid". Leave the pie until the jelly hardens for a couple of hours or overnight, then serve.
Bon Appetit!