Christmas tree toys made of salt dough. How to make Christmas toys from salt dough? Salted dough beads
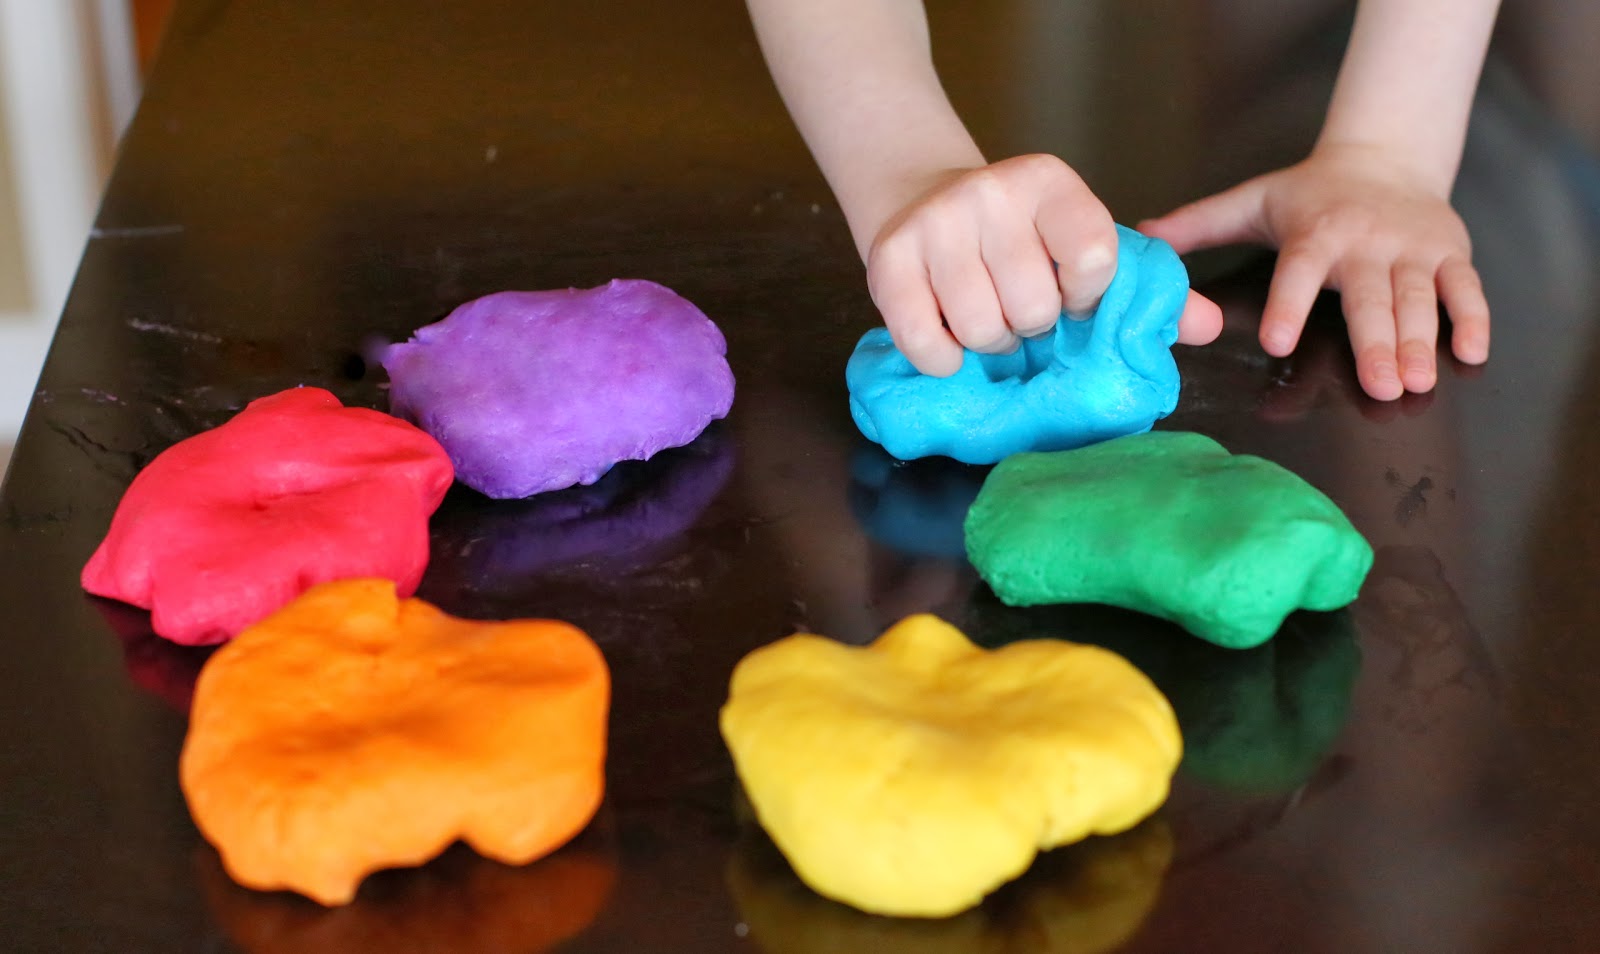
Sculpting is a great way to develop fine motor skills in children. However, kids love to taste everything, so traditional modeling materials, like clay or plasticine, are often not suitable for practice. There is a great alternative - salted dough: it is very easy to sculpt from it, it is much softer and more pliable than the same plasticine, at the same time, it is absolutely safe for the child.
Any product can be made from this material. Small children (from one and a half years old) can, under your guidance, try to create simple figurines from salt dough, and an older child can try any crafts, souvenirs or toys that only imagination and skill are capable of.
How to make salty dough?
On top of all the advantages of such a sculpting material, it is also very affordable, as it can be quickly made in your kitchen.
There are many recipes for making salty dough, so everyone has the opportunity to choose the most convenient and simple one for themselves.
Here's one way:
- take a glass of salt (about 200 g), add 2 glasses of flour, and diluting with water (more than half a glass), knead the dough;
- you will determine the degree of its readiness along the way: if the dough sticks to your hands and stretches too much, add a little more flour, and if it crumbles, then there is not enough water;
- try rolling a ball and making several indentations in it ( ready dough it will keep its shape well without blurring);
- when mixing, it is recommended to add a little (a tablespoon) of vegetable oil;
- add 2 tablespoons of starch to sculpt relief figures;
- wrap the well-kneaded mass with polyethylene and refrigerate for several hours;
- toys made from salt dough can be painted ready-made, or you can cook right away colored dough(do in several separate containers and add when mixing food colorings, instant coffee, beetroot or carrot juice, acrylic or gouache paints, etc.
You can watch special master classes if you are going to sculpt for the first time.
The purpose of modeling lessons for children should be to form interest in this art, to familiarize themselves with all the properties and capabilities of the material: the dough can be torn, crumpled, flattened, rolled, crumbled, dried. Teach your child to come up with plots, make toys or figurines of acting characters for them, combine them into whole large compositions. This will help you not only develop and improve the fine motor skills of children, but will also develop their imagination, imagination, and speech.
We sculpt simple crafts with kids
Sculpt should be on a special sculpting board or baking sheet. Also prepare a small rolling pin to roll out the dough, a brush (you will sometimes have to wet the dough with water), stacks - sticks for working with plasticine or dough, other details, depending on the direction of your work (paints, molds, decorations, etc.).

If you are just starting to work with a small child, choose the simplest schemes and master classes so that it is easy and interesting for children to sculpt products.
First, you can do something, demonstrating this to the child, then perform actions with his hand, and then let him try to create a toy from salt dough with his own hands.

Together with the kid, come up with a fairy tale about your character. For example, it is very easy to make a cute little caterpillar or even her whole family, and then play with them.
In the same way, other toys are very simply created - octopuses, snakes, cats, fish, birds, vegetables and fruits. You can cut out cardboard blanks, and then trace them already on the dough.
Also, for little children, a very simple master class on making figurines from salt dough as Christmas tree decorations will be available.
As a memorable home souvenir, you can make prints of the child's feet and hands, and on the back, sign how old the baby was.

Making more complex toys
There are master classes that show that you can create more complex toys, figures or even whole compositions with your own hands. For example, try to make a cute hedgehog or the whole hedgehog family with older children.
In the same way, you can make a lamb, an owl, and any other voluminous toy.
Master classes will even help you create whole pictures from salted dough, which will become not only an excellent decoration for your home, but also a wonderful original souvenir for a gift. It is better to sculpt pictures on fabric, foil or painted cardboard. When the craft is completely dry, paint and varnish it.
Salted dough is a worthy alternative to plasticine and clay. The advantage of this material for creativity is that the figures become strong after drying, they can be painted with paints, varnish, felt-tip pens, you can play with them for a long time.
By the way, look what you can make as a gift for the New Year.
The advantage of the dough over clay is its cheapness. Today I want to show you how to make Christmas toys from salt dough and how to decorate them. The most common flour is needed. Whole grain or rye will not work because the dough from them turns out to be sticky and not suitable for sculpting toys. We also take the cheapest, fine-grained salt.
What you need to make toys from dough:
- Wheat flour,
- salt,
- water,
- a bowl,
- bed.
Stages of creating Christmas tree toys from salt dough:
Pour flour, salt and water into a bowl. Knead the dough. It is necessary to achieve the consistency of plasticine. To prevent the dough from sticking to your hands, you can moisten them with water or sprinkle with flour. Put salt at the rate of 1 tablespoon in a full glass of flour. The dough will taste very, very salty. This is to prevent the toys from becoming moldy over time. We connect the child to the process. The result should be an elastic, flexible, uniform dough. 
Put the resulting elastic dough on the table, roll it out with a rolling pin or jar. Do not roll it too thin, otherwise the toys will be fragile. The optimum thickness is 5-7 mm. 
Squeeze the figures out on the rolled out salt dough using molds. To do this, you can use a glass, then the toys will be round. Can be cut with ready-made cookie cutters. Or you can fantasize and draw something original on the test, for example, circle the palm of your child. 
Or cut a herringbone. 
I used a brush for these purposes, piercing the opposite end along the fingers, leaving marks on the dough, then cut it out with a knife. If the toys are made as Christmas tree decorations, you need to make a small hole for the string at the top of the toy. It is convenient to use a juice straw. In general, you make any figures. 
Christmas toys made from salted dough can be decorated with beads of different colors and sizes, shells, sequins, beads, etc. You can make a spiral from beautiful woolen yarn. As long as the dough is fresh, it is very pliable and easy to fix on it. various decorations... You need to allow the child to fantasize, allow him to decorate the toy in his own way, you should not interfere, even if it comes out clumsily or not very aesthetically pleasing from the point of view of the mother. Having completely decorated the toy on their own, the child will be proud and pleased with himself. 


Next, be sure to dry the cut out toys. This can be done in the oven at the lowest temperature in a few hours. Or you can dry it on a battery, it will take one or two days. Finally, toys can be decorated. 


I use acrylic paint and nail polish. My son and I (3 years old) got such Christmas tree decorations. He did half last year and half this year. When they took out the Christmas tree decorations, he remembered that he had made them himself, he was happy and wanted to do the dough again, again to create something beautiful with his own hands!
If you love sewing, then you can sew beautiful
This article will show you how to make your own salted dough and how to dry it. A lot of photos and step-by-step instructions will help you mold a dough craft for any holiday.
For modeling lessons with young children, it is better to use salt dough or Play Dоh plasticine.
How to make craft dough: recipe
You can make the dough yourself, for this you only need a few simple ingredients: flour, fine salt, citric acid, vegetable oil and water.
First mix 1 cup flour with 0.5 cup salt and 2 teaspoons citric acid... Pour into a saucepan, add 1 tablespoon of oil to the dry mixture. Put on medium heat, gradually add water and stir. Water should leave no more than 0.5 cups. When the mass has lagged away from the sides of the pan and becomes one lump, remove the pan from the heat. Take out the mass, put it on a board sprinkled with flour, and, as regular dough, knead with your hands.
If you want to make a colored modeling dough, you must first dilute the dry food coloring in the water. You can also add a little gouache to the finished dough and knead it well so that the color becomes uniform.
How to prepare salted modeling dough?
Make a salty dough. Paint it different colors, depending on what you want to dazzle. The dough can be made uncolored, divided into balls and in each add a little gouache of the desired color and knead. It is better to make the dough in regular colors, and then mix them to achieve the desired result.
Keep the dough in a bag, or wrap it in plastic wrap, you can put it in a closed container so that it does not dry out. If it is dry, add a little water, and if it is too wet, add a little flour.

- Thin the dough and simply spread it on the base of the craft, so you can make butter on a piece of bread, or make brown dough chocolate icing for cake
- Try on the food you made with toy plates that you will play with later to make them match in size
- Use a wet brush to stick the pieces of salt dough together. Smear the joint with a brush, and stick the pieces to each other.
- When sculpting food for dolls, it is very important to make the dough as much as possible in the same color as the original, for example, the carrots should be orange, not yellow or red
- To prevent the colors from fading, open the craft with varnish. For lessons with children, you need to use special harmless varnishes, they do not have an unpleasant odor, because they are made on a water basis


Drying figurines from salt dough for modeling
There are two ways to dry salt dough crafts.
- Air dry the crafts. It is best if you place them on a smooth surface and leave them on for a few days. When the craft is dry, turn it over or lay it on its side to dry on all sides
- Baking in the oven. Preheat the oven well, put baking paper on a baking sheet, spread the crafts on top, put in the oven and turn off the heat. The oven must be closed and not opened until completely dry. You can also bake crafts at a temperature of 100 ° C, but in this case, you need to watch them so that they do not burn
These two methods can be combined, for example, dry for an hour in the oven, then leave in the air, after a while in the oven, and so on until it dries.
Of course, if the craft contains other decorations (beads, beads), you need to dry it in the first way.
Christmas crafts from salt dough
The child will really like to decorate the house before the New Year and do handicrafts with their parents.
Christmas tree toys made of dough

 Salted dough can be used to make great Christmas tree decorations, and even toddlers can handle making them.
- Prepare modeling dough in different colors or uncolored
- Roll a cake out of it and squeeze out a figurine, you can use cookie cutters
- Make a hole with a cocktail tube so that later the figurine can be hung on the tree
- Decorate the toy as you and your child want: stick multi-colored balls-cakes on the Christmas tree, make a garland for it, let it rain, add white snow to the toy
- Unpainted dough can be dried first and then painted with paints or markers.
- Dry the dough or bake in the oven
- Pass the ribbon through the hole and hang the toy on the tree
You can make a lot of holes in the figures.


Or stick beads, beads and other beautiful stones into the dough, but in this case, these toys cannot be baked in the oven.


You can decorate toys with ribbons or decorative strings.


After the dough is dry, apply PVA glue on it and sprinkle glitter on the figures.

Use a permanent marker to color the uncolored dried dough.


Cut out a figurine in the shape of a mitten, make it a beautiful colored ribbon from colored dough and decorate it with a homemade button. This figurine can be baked in the oven.

Print the baby's palm and draw Santa Claus in it - it will not only be a wonderful toy for christmas tree, but it will also be remembered.


You can also make such a Santa Claus toy. Use a garlic press to give him a beard. 
Make some more brown dough gingerbread toys like this.

Making a New Year's candle out of dough
To mold a New Year's candle, you will need dough for modeling in different colors, a cardboard cylinder, for example, from a roll of paper napkins and red and yellow napkins.
- Have your child roll up colorful sausages.
- Stick them over our cardboard base


- Decorate it with colorful balls
- You can just stick one color around a cardboard cylinder and then decorate it.


- Make a fire out of napkins and secure it at the top of our candle


Christmas tree made of dough
- First, make a blank for a Christmas tree, for this you need a cardboard box made of juice or milk. Cut off its top first, cut along the side folds, open. From the rectangles, you need to cut off the excess so that you get isosceles triangles. See how to do this in the diagram below.


- Glue the cardboard base for your tree


- Now let the child decorate it: let it stick over it with green dough - you will have a Christmas tree. It remains only to add balls, a garland, a star to it, and do not forget about the gifts under the Christmas tree

You can also make such a Christmas tree

Easter crafts made from salt dough
For Easter, you can make the following crafts from salt dough:
- Decorated eggs made from tortilla dough

- Figurines of bunnies, carved from a cake of salt dough.
- Decorated voluminous Easter egg


- Egg stand


Easter eggs made from dough
Even a tiny one can cope with this task.
- Take the dough, mold an egg-shaped figure out of it.
- Decorate it as you like with your child.


You can use mixed dough of different colors for the base, you can make the base from unpainted and then paint with paints or markers. Crack eggs open with glue and sprinkle with cosmetic glitter. Glue colored balls by moistening the junction with a wet brush. Press beads, pasta, cereals, and other decorations into the eggs. Make prints with different objects.
In general, fantasize!


Dough egg stand
To do this, you will need a cardboard cylinder, dough and paints.
Cover a cut cardboard circle with unpainted dough, mold its tail, head and other parts, as shown in the diagrams below.


Don't forget to seal the dough all around the stand.

Decorate the craft as your fantasy tells you, you can use gouache or watercolors.


Open up with water-based varnish to brighten the colors and last longer.

Crafts from the test for February 14 for Valentine's Day
What do everyone associate with this wonderful holiday? Of course the heart! Let's make a festive heart with a child and give it to parents.
Salted dough heart

Here, as elsewhere, we first make the base, in our case the heart, and decorate it!


You can decorate with roses, it will be very beautiful. How to sculpt roses, see the step-by-step instructions with the photo below.


You can make such a strap with paws.

These cute couples are made very quickly and easily.


You can make many such heart-shaped figures, make holes in them and make a garland out of them, which you can use to decorate the wall in the house.

Photo frame made of dough
Make an empty heart, decorate it and use it as a frame for a family photo, secure it on the back with colored cardboard.


Salted dough decoration
Such a loving fish will definitely suit mother's outfit on this holiday.

Crafts from the test for March 8
On March 8, you can make such flower keychains for mothers, grandmothers, aunts and sisters. They can be done with younger children. You can use multi-colored dough or unpainted, and then decorate it with paints.


You can dazzle such a flower candlestick for a gift.

Make such interesting medals with the children, and most importantly, they are all different. Let the child give them himself.


Blind figurines in the shape of a figure eight and decorate with flowers, stones, beads, in general, for which there is enough imagination.


Make a pendant with your child, for example, in the shape of a heart and decorate it: blind flowers, leaves, decorate with paints, sign a congratulation.


Salted dough roses
- We take the dough for modeling you need colors
- Sculpt a cone


- Roll up the ball, flatten it gently into a round cake
- Glue the ball to the cone


- We make the second ball and glue it on the other side - we got a bud
- We make a few more balls and also sculpt petals from them. We cling them in a circle

- Bend the upper edges of the petals back a little, and press the sides to the center


- We make a few side by side, depending on how lush you want to get a flower
The rosette is ready!

 If necessary, make leaves of green dough, push the veins with a toothpick. Make the legs from the sausages. Connect all the details in one flower.
Crafts from the dough by February 23

Such a medal will definitely please.


Airplane - craft from salt dough
An airplane made of salt dough will be a wonderful gift for dad or grandfather.
- Roll up the base for the figure - this will be the body
- Bend one side of it a little - this will be the tail. Attach the remaining parts to it

- Roll up the wheels for him and fenders


- Go through with a damp brush and attach the parts to the body


- Blind and attach the wings in the form of triangles on toothpicks

- Make a propeller and use a toothpick to attach to the body as well


- Let the figurine dry for a few days.


- Decorate the airplane with gouache


Crafts from the dough for Shrovetide
Shrovetide is an ancient holiday with many symbols and traditions. Crafts for this holiday are very diverse, you have plenty to choose from.
For the little ones, you can offer to make the sun, which symbolizes the onset of spring.

 Here is such a sun for older children.

 Have your child make their own pancakes using salted dough.
 Pancakes-key chains


Panels and pictures from salt dough
With older children, you can make a picture out of salt dough.
For example, it could be a fruit basket. Follow step by step instructions with the photo below.
- Roll out the uncolored dough to a thickness of about 0.5 cm
- Prepare a basket template and, attaching it to the dough, cut out the basket from it
- Squeeze out the dough using a garlic press, twist it into flagella, stick it, having moistened the junction before this, on the handle of your future basket.


- Use a stack or knife to push through the lines that simulate basket weaving

- Squeeze out from the rolled dough with a mold or cut out a few leaves according to the template. Sell them veins
- Stick the leaves on the basket


- Now prepare the fruits: apples, plums, grapes, etc. Roll balls of different sizes for them and give them the desired shape. For apples, in the place where the dried inflorescence should have been, stick the seasoning with cloves, the apples will look like real
- Put it all together in one picture


- Leave your craft to dry for a few days, preferably in a natural way
- Color at your discretion
Here is a simpler picture you can make with smaller children.
- Draw a background to it
- Draw the outlines of the character shapes
- Ask your child to stick the dough without going out of the way
- Leave the painting to dry
- When it's dry, invite your child to paint the characters.
- Draw small details
- Open the picture with varnish, put it in a frame and you can hang it on the wall


Step-by-step dough crafts
Below are a few step-by-step instructions with a photo for sculpting salt dough with children.
Salted dough beads
- We take colored dough, you can have the same color, you can different
- We roll balls from it, preferably evenly and of the same size. You can make the size in descending order
- Pierce the balls gently in the center with a toothpick
- We leave them to air dry for several days. Flip them periodically on opposite sides.
- When the balls are dry, carefully remove the toothpicks
- We string the resulting beads on a string or ribbon
- You can paint the beads with paints or markers

Salt dough horseshoe
- Roll out the dough into a flat cake, 1 cm thick
- Attach a horseshoe template and cut out a figurine with a knife
- Blind the leaves, cut off the excess, push the veins on them
- Blind the berries and the flower, make holes in the berries and stripes on the flower with a toothpick
- Lubricate the horseshoe with water and stick all the details
- Use a toothpick to make holes around the horseshoe. Make two holes through the top to hang the figurine on the string
- Leave the horseshoe to dry completely or bake in the oven
- Initially, the dough can be taken in a certain color for each detail, or you can decorate it with paints at the end.


Dough star
- Roll out the dough into a layer about 1 cm thick
- Cut out an asterisk or other figurine with a cookie cutter
- Lubricate the corners gently with a wet finger so that they are smooth
- We decorate the figurine: we make her eyes, mouth, nose, pierce the holes with a toothpick, add decorations
- Bake in the oven or air dry
- We open with varnish


Dough caterpillar
- Roll the green dough sausage
- We cut it into equal circles, roll balls from them
- We mold the balls together, do not forget to moisten the junction.
- Making a caterpillar's face
- We pierce the figure with a toothpick or a pin in the place where we will attach it to the ring
- We dry our craft


Salted dough apple
- Roll out a ball of dough in the form of half an apple. To make the cut even, press it down to some smooth surface.
- Add a flat white center
- Roll apple seeds and a tail from brown dough. We make leaves from green
- Putting the figurine together and drying it


Crafts from salt dough - hedgehog
- Form the body and head of a hedgehog from unpainted dough


- Make him a nose and eyes, you can use black dough or peppercorns


- Use nail scissors to cut the dough, making needles, lift them up a little. Cut the second row in a checkerboard pattern, and so on until the end


- Leave the hedgehog to dry. When it completely hardens, you can paint it with paints and sprinkle with varnish.


Salt dough crafts - animals
Many animals can be sculpted from salt dough with children. Below are some step-by-step instructions with a photo.
Dough lamb
- Roll 4 balls - these will be the legs of the lamb. Place them in a square, pressing them tightly against each other (look at the photo)
- Roll up a piece of foil and place it inside the dough. Roll a ball out of it - this will be the body of a lamb
- Add a head to a sheep, blind eye balls, horns and ears from sausages
- To simulate wool, make many small balls and stick them around the back of the figure, pressing them down a little.
- Dry your craft and paint with paints and / or markers


Salted dough owl
- Roll out the dough into a round tortilla
- Use a felt-tip pen cap to push in waves, imitating plumage
- Roll your sides inward - these will be the wings
- Wrap the upper part towards the center too, stretching a little on the sides - this will be the head and ears
- Stamp with an eye cap and a toothpick add a beak
- Dry and paint


Dough elephant
- Roll up the ball, pull it out a little - this will be the body of an elephant
- Make 4 thick sausages - these will be the legs
- Blind the trunk of another
- Make a tail from a thin sausage
- Roll out two cakes, put smaller diameter and pink plates on them - you will get ears
- Collect everything in one figure and do not forget about the eyes
- Dry the elephant and open it with varnish

Dough crafts - cat
- Cut out the cat template from cardboard


- Roll out the dough in a layer of 0.5 cm
- Attach the template and cut the cat out of the dough

- Let the dough dry
- Using sandpaper, sand around the perimeter of the figurine.


Paint the cat with a pencil and then paint, let it dry


Frame the panel


We make a fish from salted dough
- Roll out the dough 0.5 to 1 cm thick
- Cut the fish according to the template
- Decorate it: make voluminous eyes, fins and a tail, imitate scales with caps from felt-tip pens or other improvised means
Let the mushroom dry and color it


Dough crafts - fruits and vegetables
From salt dough, you can mold many different vegetables and fruits, with which you can then play and feed the dolls.
Remember that the colors of the food for the dolls should be matched as closely as possible to the original ones.


Following the step-by-step instructions and photos, you can mold interesting figurines from salt dough, which can then be presented to friends and family for different holidays. We hope in this article you have found a lot of interesting works and useful information. Enjoy your activities and beautiful crafts!
VIDEO: Craft from salted dough "Owl"
0 62 411
Modeling is one of the most rewarding activities for babies. With its help, not only fine motor skills of the hands develops, but also perseverance, imaginative thinking and coordination of movements are developed.
One of the best materials for sculpting with your child is salt dough. It is absolutely safe, does not contain harmful additives and easy to work with. DIY salt dough crafts will become wonderful souvenirs for your relatives and friends.
Universal recipes
You can find a great variety of salt dough recipes. Each master adds his own additives to them, selecting the desired consistency. The main products for kneading dough are salt, flour and water.Depending on the purpose, its density may be different:
- dense dough - for large parts and creating massive panels;
- universal dough of medium consistency - it is convenient to make small pictures and figures from it;
- soft dough- delicate and pliable, it is suitable for small items, exquisite flowers and figurines.
Dense dough
For work you will need:- wheat flour - 1 part;
- edible salt - 1 part;
- water - 0.7 parts.
That is, to knead this type of dough, you need to take one identical measure (glass, cup, tablespoon) of salt and flour and 0.7 of the same measure of water.
Combine dry ingredients in a deep bowl and add cold water little by little. The dough should be smooth and very firm. Grains of salt will remain in it - this is normal, do not worry. Depending on the moisture content and the quality of the flour and salt, you may need a little more or less water. Therefore, you cannot pour it into the dough all at once.
Medium dough (universal)
For work you will need:- wheat flour - 1 part;
- water - 1 part;
- edible salt - ½ part;
- finely ground salt (extra) - ½ part.
Soft dough
For work you will need:- wheat flour - 1 part;
- hot water - 1/4 part;
- finely ground salt (extra) - 1 part;
- PVA glue - ¾ part.
This dough is ideal for difficult work. It perfectly holds its shape, preserving the prints and the texture created on it. Its quality directly depends on the quality of the selected glue.
Figures sculpted from salt dough with glue differ special durability. They will delight their owner for more than one year.
- If you plan to dye finished products, it is better to use wheat flour, although rye flour can be used for salty dough.
- Do not take iodized salt - the finished figurines may crack when dried.
- The dough can be tinted while kneading. For this, food colors or watercolors are used.
- The finished dough must be wrapped in plastic wrap or plastic bag to prevent it from drying out.
- Unsuccessful dough can be reanimated. Add a little more flour to the liquid one and re-knead, the too tight dough is moistened with water and kneaded, achieving the desired consistency.
- Do not add grease or hand cream to the dough you intend to dye from - the paint will not lay evenly.
- The finished dough should be stored in the refrigerator for no more than 2 days. It loses its qualities and it will be inconvenient to work with it.
- It is best to sculpt bulky products on wire or cardboard frames so that they do not fall apart.
- Crafts can be dried naturally by leaving them for a couple of days, baked in a warm oven, or left next to a radiator. It is categorically not recommended to put figures on the battery itself in order to avoid their cracking.
- It is best to paint crafts with acrylic paint or gouache. Watercolors should not be used: there is a risk of soaking and ruining the product.
- The junction of the parts must be moistened with water using a brush. So they will connect firmly and quickly.
- The finished souvenir can be coated with colorless nail polish or acrylic varnish. This will protect it from moisture and the paint from fading.
Cute hedgehog - toy for toddlers
Do you want to know what you can do with your child from salt dough? Start with the simplest crafts. The younger your baby is, the easier products for joint creativity should be. Try to mold a prickly hedgehog, and detailed description process in this mk guarantees an excellent result and good mood from a useful activity.
First, prepare your all-purpose salt dough and nail scissors. Roll a drop-shaped blank from a piece of dough.

The eyes and nose of a hedgehog can be made from beads, black peppercorns, or pre-dyed dough.

The needles are made using incisions. Use the tips of the scissors to make small cuts while lifting the needles up.

Perform the next row in a checkerboard pattern - with an offset. Make cuts row by row until the entire back of the hedgehog is covered with needles.

Dry the finished toy in the oven or simply in a warm and dry place. If you wish, you can color it or entrust this important matter to a child.

An original souvenir - a funny dachshund
You can start preparing for the future in advance. new year holidays and make a funny dachshund as a gift to friends.
For work you will need:
- universal salted dough (see the recipe above);
- cardboard, pencil, scissors;
- paints and brush;
- a piece of rope;
- clear nail polish;
- toothpick;
- foam sponge;
- glue "Dragon".
Transfer the template to a piece of cardboard and cut.

Roll out the dough about 5 mm thick on baking paper. Attach a template and cut out the outline of the dachshund along it. Carefully remove the cuttings so as not to deform the workpiece.

Roll two balls and form them into oblong dachshund eyes. Glue them on a drop of water to the head of the workpiece. Moisten all the sections of the dog with water and iron it with your fingers to remove any irregularities.

Use two small pieces of dough to make the eyelids and glue them over the eyes. Use a toothpick to outline the ear, legs, mouth, nose, and body contours.

Now you need to add volume to the workpiece. Roll an oval out of the dough, glue it to your ear and smooth the joint with a wet finger.

Add volume to the back of the dachshund and tail in the same way.

Use a toothpick to press the oblong indentations along the perimeter of the figurine. Make them randomly of different lengths from the edges of the body to the center.

It's time to dry the workpiece in a warm oven. Bake it until it is completely hard.
The dry figurine needs to be painted. Apply black gouache over any bumps or dents.

After the first coat of paint has dried, paint the dachshund yellow. Put some paint on a foam sponge and tint the entire body, while the dents should remain black - do not overdo it.

For a dried dachshund, paint the eyes with white. Make any inscription you want.

Glue a piece of rope to the back of the craft.

Cover the item with clear varnish and let it dry. The result of the work done is impressive - the mischievous puppy is ready.

Dog with original coloring:


Spectacular fish - step by step master class
Try to mold a beautiful fish with your child. Just follow detailed instructions- and even little helper will be able to master this sculpting technique.
For work you will need:
- salty dough universal;
- brush;
- grooved felt-tip pen cap;
- ruler.

Squeeze the dough on one side of the circle with two fingers, forming a ponytail.

Correct it and smooth out any irregularities.

On the opposite side, make the mouth of the fish with the handle of the brush.


Use the edge of a ruler or the blunt side of a knife to press through the marks on the tail and fins.

Roll up small balls and glue them on the head of the fish. These will be the eyes.

Make pupils from the smaller balls and press them against the eyes with the brush handle.


It's time to decorate the workpiece. Use the cap of a felt-tip pen to push through the first row of scales.

Roll many small balls. Glue them on a drop of water to the body of the fish just behind the cap imprints and flatten with the back of the brush.


If there is a suitable print, make a starfish print, no - get by with the already familiar cap or take a different template.

Then push in two more rows of cap prints.

Roll a thin sausage to shape the tail.

Glue it to the blank on the edge of the tail. Fill in the entire tail in the same way.

Next, randomly glue and push in a few more small balls.
Dry the resulting workpiece in a warm oven.

Color the fish, guided by your ideas of beauty and colors available. If you stick a magnet on the back of it, it will proudly take its place on the refrigerator, decorating the kitchen of its lucky owner.
And here are some more fish ideas:


Cheerful boletus mushroom
The initial stage of learning to sculpting is already over - you can take on more complex products from universal salt dough. Try to master the lesson of making a funny big-eyed boletus. Such an interesting mushroom will be appreciated not only by a child, but also by an adult.
For work you will need:
- salty dough universal;
- burnt out light bulb (classic pear-shaped);
- cardboard;
- acrylic paint or gouache;
- foil;
- paper napkins;
- masking tape;
- Super glue.

Cut a ring out of cardboard and put it on a light bulb - this is the basis of the future mushroom cap.

Use crumpled paper towels to form a hat of the desired size. Secure the structure with tape.


The result is such a blank.

Wrap foil around the hat for extra durability.


For the hat, you can use dough of any color, later the whole toy will be dyed. Roll out a piece of dough into a circle at least 3 mm thick and stick over the top of the mushroom cap.

Remove the hat and cover the bottom of it.

Use the blunt side of a knife to push through the strips.

Secure the cap to the stem of the mushroom using super glue or Moment. It should be tilted slightly towards the back.

Take care of the design. Blind and secure the handles, legs and spout to the fungus.


You can decorate the figurine with a funny caterpillar or mold another decorative element, such as a ladybug.

Dry the shaped workpiece.

Color in the figurine, draw the eyes and nose, and cover with varnish. The amazing fungus is ready. Salting and eating it will not work, but decorating a shelf with it is easy.

Funny piggy pendants
Such funny pendants are the idea of an unusual Christmas tree toy or a cute souvenir for people dear to you. Such a thematic present will be very useful, because the patron saint of 2019 is a yellow pig.
For work you will need:
- salty dough universal;
- toothpick;
- thin rope;
- paints and brush;
- foam sponge;
- black gel pen;
- Super glue.
From salt dough can be done great amount crafts, for example: flowers, animals, various figures, inscriptions, numbers, toys, paintings and whatever you want! Salt dough modeling is called bioceramics. The advantage of salted dough is that it is convenient to work with, this material is absolutely harmless and crafts made from it will delight you for several years. In this article, we will look at how to make crafts from salt dough with your own hands.
You will need: Cup wheat flour, a glass of extra salt, half a glass cold water, a bowl.

Recipe

Finished salty dough should not stick to your hands or crumble. It should be cool and easy to sculpt. I recommend watching the video master class!

There are two most common ways to dry salt dough. The first way: the finished craft will dry itself. The main thing is that direct sunlight does not fall on it, otherwise it will crack. You can put the craft on a flat surface and wait a few days. Second method: dry the finished craft in the oven for 3 to 6 hours (depending on the size of the craft). Drying occurs in approaches with breaks. One approach is 1-2 hours. For quick drying in one go, set 75-100 degrees in the oven, and then, the craft will dry in an hour. At a temperature of 120 degrees, the craft will dry in 30 minutes, but it is better to dry it naturally.
There are two most common ways to color salt dough. The first method: after drying, the finished craft is painted with acrylics or gouache using a brush. Second method: food colors are diluted in water, then added during the preparation of the dough. When the craft is completely painted and dried, it must be covered with 2-3 layers of transparent manicure or furniture varnish. Each layer must dry before applying the next. In this way, the craft will last for a long time.

You will need: painted salt dough, stack, transparent nail polish, toothpick.
Master Class

The salty dough star is ready!
Salted dough caterpillar
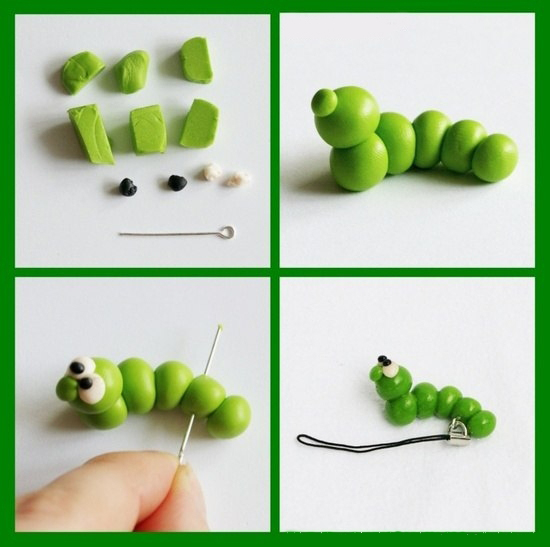
You will need: painted dough, knife, pva glue, toothpick, pendant, transparent manicure varnish.
Master Class
- Roll out the sausage.
- Cut it into 6 equal pieces.
- Roll up the balls.
- Glue 5 balls together.
- Glue the head.
- Blind the nose and eyes, then glue them.
- Use a toothpick to pierce the suspension.
- Dry the craft.
- Attach the pendant.
The salted dough caterpillar is ready!
Salted dough apple

You will need:
Master Class
- Blind the half of the apple, make the inner part flat, pressing it against a flat surface.
- Blind a thin, flat center and glue to the body.
- Roll 6 seeds and a stick, then glue to the apple.
- Blind the leaves, then glue them.
- Dry the craft.
- Cover with varnish and wait until completely dry.
The salted dough apple is ready!
Salted dough elephant

You will need: painted salt dough, pva glue, transparent manicure varnish.
Master Class
- Blind the body of the elephant by rolling up an elongated ball.
- Blind 4 legs in the shape of plump sausages.
- Blind the proboscis.
- Blind the ears of the elephant in this way: roll 2 flat cakes, glue cakes of the same shape, smaller size, of a different color to them.
- Blind a small ponytail.
- Blind your eyes.
- Assemble the elephant in the following sequence: glue the legs to the body, then glue the proboscis, then the ears, eyes and tail.
- Dry the craft.
- Cover with varnish and wait until completely dry.
Salted dough elephant is ready!

You will need: salty dough, foil, candy vase or similar plastic container, gouache, brush, clear nail polish, sculpting board, knife or stack.
Master Class


You will need: salt dough, nail scissors, PVA glue, acrylic paints or gouache, nail polish brush.
Master Class

Salted dough hedgehog is ready!
Owl (eagle owl) from salt dough

You will need: salt dough, pva glue, nail file, nail scissors, acrylic paints or gouache, brush, wooden plank with pendant, transparent manicure varnish.
Master Class

Salted dough owl is ready!

You will need: salty dough, the base on which the craft will be attached, for example, a board or plate, a stack or a knife, a sheet of paper, a simple pencil, a garlic crusher, a rolling pin, PVA glue, acrylic paints or gouache, a brush, transparent manicure varnish, cloves.
Master Class

Salted dough fruit basket is ready! I recommend watching the video master class!

You will need: salt dough, a knife, a rolling pin, a simple pencil, a sheet of paper, sandpaper, acrylic paints or gouache, a brush, transparent nail polish, glue gun or PVA, a base for crafts, for example: a board with a frame, transparent nail polish.
Master Class

Salt dough pencil

You will need: water, flour, extra salt, a cardboard jar for the frame, PVA glue, scissors, a piece of decorative cord or corrugated paper, gouache, brush, button, stacks, acrylic varnish for crafts, toothbrush.
Master Class
- Knead the salted dough in this way: pour a glass of flour, a glass of salt, add water, then knead until the desired consistency of molding. Separate a portion of the dough, add beige gouache, then knead.
- Roll out a flat cake 10-15 mm thick.

- Apply PVA glue to the outer rim of the jar and wrap with dough. Cut off the excess with a stack, and smooth out the joints with a damp brush.
- Create a small dotted texture with a toothbrush on the surface of the dough.
- Knead the dough Brown color, roll it into a cake 10-15mm thick.

- Cut a 5 cm wide strip of brown dough and glue to the bottom of the jar.
- Form 2 large owl eye bases with white dough, then glue them.
- Form a brown dough beak and glue it.
- Blind the eyes from the turquoise dough and glue them.
- Roll 8 strips of pink dough, twist 4 flagella from them and mold a bow, then leave it to dry for 2 hours.
- Blind the owl's wings into brown dough droplets, then glue them.

- Weave a string of beige dough and glue it to the neck of the jar.
- Roll a sausage from white dough, draw the texture of lace with a stack and glue it as a collar under the beak.
- Put the craft in a warm place for a day.
- Paint the bottom and wings with brown gouache and decorate with white dots.

- Paint the pupils and eyelashes with black gouache, wait for the paint to dry, then paint white highlights on the eyes.
- Glue the pink bow above the wing.
- glue a button with a bow from a corrugated strip to the lace.
- Cover the craft with varnish and wait until it dries completely.
The salt dough pencil is ready!
Salted dough dachshund

You will need: salt dough, a simple pencil, scissors, cardboard, paints, brush, rope, toothpick, foam sponge, transparent varnish, PVA glue.
Master Class

Dachshund made of salted dough is ready!
Salted dough boletus mushroom

You will need: salt dough, light bulb, paints, brush, foil, cardboard, masking tape, superglue, PVA glue, paper napkins, clear varnish, stack.
Master Class

The boletus mushroom from salted dough is ready! I recommend watching this video!
Funny pigs made of salt dough

You will need: salt dough, paints, brush, foam sponge, stack, thin string, toothpick, black helium pen, PVA glue.
Master Class

The funny salt dough pigs are ready! I recommend watching this video!

You will need: salt dough, baking sheet, rolling pin, knife, sheet of paper, acrylic paints, brush, ribbon, water, shoe spoon, pencil, sandpaper, transparent nail polish.
Master Class
